Tuesday, May 26, 2009

Final Class Blog

Robotics has come to an end after a semester of hard work and programming. I have learned many new things such as robot construction, programming the NXT, and using each type of sensor.
On the subject of robot construction, the way I would go about building a robot now is very different than if I were to build a robot 6 months ago. I have learned many construction techniques that make a strong, stable, reliable, and interchangeable robot. To do this, you can't just slap a bunch of parts together. You must plan out everything and think about how each aspect will affect the stability of the robot. Another concept I learned was modularity. Modularity is the ability to take off one piece of the robot without having to take the whole robot apart. This came in handy for many of the challenges where we modified the robot extensively to get it to perform the tasks better. The more modular the robot was, the greater chance of success it would have because it wouldnt break and it would go straight always.

Another thing new to me was programming. I had never programmed before and this class taught me the basics. It taught me that the robot does exactly what you tell it to do. No more or no less. This was frustrating at times because you had to really think about why the program was not working and sometimes use new blocks which you were not accustomed to. I also learned that when programming, it is important to label everything such as the values above the turns. This serves the purpose of letting you know how many degrees your robot turns without having to open up the block and check. Another thing I found useful in programming was the use of my blocks. My blocks give you the advantage of having a set of blocks all crammed into one block which you can use over and over again. This save me a lot of time while programming and if I had to change a turn because it was consistently bad, I could change it once and all of the turns would be fixed.

The next thing I learned was sensors. Sensors give the robot more of a human-like attitude. They let your robot have senses such as light, sound, ultrasonic (something which us humans can't even do), rotation, and touch. Using these was essential to completing the challenges as without them, the robot would be very inaccurate and could not change its plans on the spot. Each sensor had its little quirks which had to be worked out in the investigations. This was shown in the ultrasonic sensor when we found the shape of the area of detection. My sensor was actually reading a different area than the rest of the classes ultrasonic sensor. This made me take the ultrasonic readings in the challenges into closer consideration to make sure my robot could still perform all of the tasks

Through robotics, I have learned how to apply the areas of math, science, and technology into real world applications such as robotics. To do robotics, you have to think logically, make different calculations for distance and motor rotations, apply physics to build a better robot, and program the robot using technology. This class has really helped me seen the connection between these three areas to the real world which leads me to my next point about communication between classmates to succeed.

Communication, reasoning, and collaboration were essential in this course. Without them, we wouldn't have been able to accomplish as much, or help fellow students finish challenges. This was shown when we worked together on investigations and even when we were working alone, we collaborated so that we could get across the finish line and work as a team while working at the same time individually. We communicated our results through the blogs which are accessible to anyone in the world. This helps people to get ideas and build on them or help a struggling student somewhere in the world. Finally, reasoning was very important because as mentioned before, robots do exactly what they are told. You have to reason through the problems and think why the robot is doing what it is doing. My reasoning skills have improved by taking robotics and solving problems with various robots.

All in all, Robotics class was a good learning experience in which I learned many skills that will help me for the rest of my life. I learned to think logically, communicate, program, and apply things im learning in other classes to the real world.

Sunday, May 24, 2009

Patrol Robot: Continue E-Stop Challenge


Today I finished the last of the continue phase for the patrol robot. In this section, the challenge was to create a robot that would stop when there is a loud noise. This would be useful in the real world if someone yelled stop and the robot would be able to stop. This challenge was fairly easy for me because I had already completed the emergency stop anytime activity with Kenny. To do this, I had to drag another program beam from the beginning of the program and put in a wait for sound sensor block, a stop move block and a stop block. At the bottom of the page, it had a segment on the calibrate block so I looked into it and it seems to be a pretty useful block. This block can recalibrate the sensors mid-program to compensate for motor noise or background noise. To do this, I put the calibrate block in after the motor block to account for any noise from the motor.

Wednesday, May 20, 2009

Ch. 17-- Logic


This chapter took a while to fully understand. The logic block is an advanced block with many uses. THe logic block takes a yes/no response from other blocks via data wires and interprets them based on what you tell it to do. The logic block has a drop down menu with four options: And, Or, Xor, and Not. For the and option, both responses must be yes for a final yes to be generated from the logic block. For the or option, only one response must be yes for a final response of yes. For the Xor option, only one plug can be yes for a final yes value. For the not option, plug A is reversed and plug B will be disabled. Data wires must be connected for the logic block to work. The Logic block has 3 data ports. A port A, a port B, and a yes/no output. Take a sensor or anything else you want to use logic on, and and take a data wire and connect it to a or b.

Patrol Robot: Continue Lamp Challenge


This part of the continue phase involved putting a lamp onto the robot and having it flash when the door is open. Also, you had to incorporate a my block into the program in the lamp part. To do this, I had to add a lamp to my robot and set up a new program. My program is shown below for both the my block and the main program. To get the programming right, I used lamp then wait blocks set for 1 second then the lamp would go off then wait for 1 second. All of these lamp and wait blocks were put into a loop and set to stop when the touch sensor is pressed.

Patrol Robot: Continue Bluetooth Challenge


The first part of the patrol robot continue phase was bluetooth communication. It recommended looking at another page which explained all of the bluetooth techniques so I looked at that and figured out how to get the bluetooth connected and write simple programs with that. The challenge for this section was to have the robot detect if a door is open or closed and then send a message to another nxt saying that the door is open or closed. This program involved using data wires and bluetooth send and receive blocks. The main part of the program with the bluetooth blocks is shown below if you want to see it. The receiving robot had a simple receive message block with a data wire going to a display block.

Monday, May 18, 2009

Day 4: Obstacle course

Thinking back on the obstacle course, I thought I did pretty well. I ended up finishing a day early and my robot was able to complete all of the challenges. I had a fairly stable robot design which curved to the right a little bit but I compensated for this by changing the turns and starting position. My program was also very organized because of my use of my blocks. This saved me a lot of time and trouble in the long run because I didnt have to repeat parts of the program and troubleshoot if one of those repeats went wrong. I unfortunately got some points off of my program because I didn't label my program. I ended up winning the most accurate course completion because I used the strategy of slow and steady. All of my turns were very precise. There is a video on the Day 3 blog for anyone interested.

Thursday, May 14, 2009

Patrol Robot: Contemplate


The purpose of the patrol robot is to detect if the doors in a building are open or closed. The robot makes use of all the sensors to do this. It starts out going forward until the light sensor detects a dark line. Then, it waits again until there is light to make sure the robot crosses the line. The robot then turns left and uses a switch block to detect whether the distance is greater or less than 15 cm. If the distance is less, the door is closes and the ultrasonic sensor is detecting the door. If the door is open, the ultrasonic sensor detects the back wall which is greater than 15 cm. If the door is closed, the robot turns right and proceeds to the next black line. If the door is open, it plays an alert sound until the touch sensor is pressed. A loop is placed around all of this to make the robot continue this behavior forever. This saves time because you don't have to re-write the whole program every time you want the robot to repeat these actions. The program shown gives you an idea of the block used.

Patrol Robot: Construct


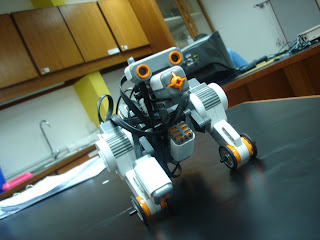
Recently, i've been working on a robot called the patrol robot. It uses a completely different design than the taskbot. It kind of resembles a dog and it even has a tail. It also makes use of all the sensors and very small wheels. The design seems to be very modular and stable. A difference between this robot and the taskbot is that the free rotating wheel is at the back rather than at the front.

Monday, May 4, 2009

Day 3 of the Obstacle Course


Today, I was able to run the robot on the course and get full marks and an extra 3 bonus points for finishing it a day early. I got some points taken off for my program not being labeled. Before I ran the course, I had to make some small adjustments to the turn after bumping the wall and the distance the robot backed up. Also, Today, My robot started pulling to the right so I had to take into consideration where to start my robot. There were evenly spaced lines on the starting line so I could consistently start in the same spot and figure out what the problem was consistently. I have since worked on my program to clean it up a little and label everything and I hope to go for neatest program.

Wednesday, April 29, 2009

Day 2 of Obstacle Course

After last class, I stayed and worked on my program and robot. Now, Ive got my robot design with all the sensors attached but im having some stabilization issues with the wheels. I think if I add a rod to them, it should stabilize them. Program wise, ive got everything up until avoiding the obstacle. I think today, ill be able to get the basic programming down which will leave me with tweaking it next class. Im hoping to finish early to get a few extra bonus points.

Monday, April 27, 2009

Obstacle Course Challenge


Today we were given the assignment of completing an obstacle course using pretty much all of the sensors we have been studying about. It starts out on a line and you must clap to make it start.I will use a sound sensor for this part. It then moves forward and stops in a box for 5 seconds. For this section, I plan on using the light sensor to detect the edge of the box so my robot can be more accurate and always stop even if the robots starting distance changes. The next step is to bump into a pillar, back up, and turn right. For this, I plan on putting a touch sensor on the front of my robot which will detect the wall. I will turn down the power on my motor so the robot doesnt break when it hits the wall. It will hit it gently and then back up and turn right. The next section is to sense a desk but not touch it. After you sense it, you must turn right. For this I will use the ultrasonic sensor. An important consideration is to put the ultrasonic sensor in the front but behind the touch sensor so the touch sensor will be able to touch the wall in the previous step. The next part will probably be the hardest. It involves sensing a randomly placed object in the course and avoiding it. For this, I will use the ultrasonic sensor again and tell it to go right it it detects an object. After it goes right, I will tell it to go forward so i dont hit the object and then turn left and forward until the finish line which I will use a light sensor. I will tell the robot to stop once it senses the black line.

Chapter 11 and 12

Chapter 11 is about loop blocks. A loop block cant do anything on its own but when combined with other commands, it can save you a lot of time. To use the loop, simply place the loop into the program and drag the commands you want to repeat into the loop. At the bottom, where you change the setting of the loop box, you have 5 options. you can have the robot loop forever, loop until a sensor is pressed, loop for a certain amount of time, loop for count, and loop for logic. If you want more actions after the loop finishes, place them after the loop. If you select show counter, a data plug appears which tells other blocks the number of loops that block has done via a data wire. If the infinity button is selected, the loop will go forever. If you choose the sensor option, the loop will end when a sensor is activated. If you choose the count option, you can tell the loop how many times you want it to loop. If the logic option is selected, the program shows a data wire which can be connected to a logic block. The final part of chapter 11 is nested loops. Nested loops are useful if you want to loop something then have the program do something else then repeat all of it again. You can loop the loop essentially. Chapter 12 is about switch blocks. A switch block tells the robot to do one thing if a certain thing happens and another thing if it doesn't happen. This can be controlled by many of the same things as the loop block. A switch block also has the ability to do more than two things. If you deselect the flat view box from the switch, it will allow you to do more than two things based on reading from a sensor etc. These blocks should be very useful in our next challenge.

Thursday, April 23, 2009

Tyler's Field of View Experiment


This week in robotics class, weve been learning about the ultrasonic sensor. Its actually a pretty cool sensor that works kind of like a bat. It sends a high pitched sound out and it tells how far away the object is by how long it takes for the sound to bounce off the object and return. We did two investigations. The first one was just the basics of the ultrasonic sensor and seeing if different objects affected the way the sensor detected them. We found that the readings are a little inaccurate with soft objects because the sound is absorbed. If the object is too thin, the sensor cant read it, and also if the object is round, it can have a little bit of an effect on the way the sound bounces back. In the second investigation, we found out what the field of view of the sensor is. In this experiment, we put a robot on the line and moved around a can and marked the outline of where the sensor detected the object. This was useful to know the information but we had no way to peel up the floor and keep it in our notebooks so we made a scale model which fit on a piece of paper. The scale for the model to the real life thing was 1:5. My results were a little bit different than the expected results probably because there was something wrong with my sensor. I have included pictures of what it sopossed to look like (Hyoungmin's results in real life) and my results on the scale model.

Wednesday, April 15, 2009

Chapter 4: Reading Sensors

This chapter was all about the different sensors available for the NXT. The chapter starts out by saying the differences between the new NXT and the old NXT. On the new NXT, there are 4 sensor ports rather than 3 and it features a different cable which locks into place. The next part is about the touch sensor. It is the simplest sensor of all. Not much has changed from the old version except for the studless connections. The touch sensor can tell if its pressed, released or bumped. The most common use for the touch sensor is as a bumper. The bumper can be made to be open and then be pressed when it runs into something, or it can be closed all of the time and released when something presses it. The next sensor was the light sensor. The light sensor detects ambient light and measures its intensity. With this sensor, you must set a threshold for it to work properly. This was shown in previous blog posts. The light sensor can measure two different types of light, reflected light (from an emitted beam from the sensor), or ambient light. Using the reflected light, you can tell what color your robot is going over or how far away a color is from the sensor but not both at the same time. you can do this because different colors reflect different amounts of light. An application of ambient light that we did was line following. If you combine the light sensor with a lamp brick, you can make a photoelectric cell which can tell if the light is interrupted. The next sensor is the ultrasonic sensor. This sensor emits a high frequency ultrasonic sound which bounces off objects and is received again and the time taken for this to happen tells the sensor, how far an object is. An advantage of ultrasonic sensors is its ability to work in the dark. Using this sensor, you can tell the robot to stop or perform an action when it approaches something that is ______ inches/cm away. The last sensor is the rotation sensor. This sensor is built into the motor. With the motors in the NXT, they can detect when going over rough terrain. For example, if your NXT is going straight, and you press down on one of the wheels, that wheel will speed up to compensate. This is a new feature in the NXT.

Line Tracking

The past week we have been working with the light sensor. In these activities, our main goal was to be able to find a threshold using the light sensor, get the robot to follow a line using the light sensor, and finally to make it follow the line faster. To find the threshold for the black line and the white to the side of the line, we must go to the NXT view menu and select reflected light. We then get the two values for light and dark. From here, we add up the two values and divide that number by two. Our next task was to get the NXT to follow a line. To do this, we started by mounting the light sensor to the front of the robot. On the programming software, we used a switch block and we selected the light sensor option. The threshold was then entered into the box. The switch block tells the robot to do one thing if it sees a value above the threshold and another thing if it sees a value below the threshold. We put a loop block around this so this behavior would repeat infinitely. We wanted the robot to track the right side of the line so we programmed the robot in the switch block to go right when the robot sees a value below the threshold and left when the robot sees a value above the threshold. The robot slowly inches its way on the line. The power on the motors must also be turned down to make it track properly. This is what the next investigation fixed. The next investigation was all about making the robot track the line faster. In this investigation, the light sensor was put on the back of the robot which was closer to the wheels which meant that the robot didnt have to turn the sensor as far to get a reading. The program for this was almost the same except this time, the robot was going backwards rather than forwards so we set the motor blocks to go backwards. We did a calculation and it took only 73% of the time it would have taken if the sensor were mounted in the front.

Monday, March 23, 2009

Chapter 9&10: Feedback & Wait for it!

Chapter 9 and 10 are all about sensors. In the first part, we learn what a condition is. A condition is something the sensor can detect such as the color on a traffic light. The Next part talked about each of the sensors: the touch sensor, sound sensor, light sensor, ultrasonic, and rotation sensors. The touch sensor is activated by the button on the front being pressed or released. In the program block for this sensor, you can choose to activate it when the sensor is bumped, released or pressed. This is useful to make the NXT look for walls and prevent damage. If the NXT has a stop block after the button is pressed, the robot will stop before the robot can damage itself. The sound sensor detects sound. In a previous investigation done last week, we found that the sensor looks for the amplitude (volume). This sensor can be programmed to respond after the sound goes above a certain level or after the sound goes below a certain level. This sensor can be used like in the drag race where we programmed it to start on a clap. The next sensor is the light sensor. The light sensor detects the amount of light. Programming it is like the sound sensor in which you can look for light greater than a certain value or less than a certain value. This is useful in applications where you must follow a line that is darker of lighter than the rest of the surface. The ultra sonic sensor sends out a signal from the sensor and it has a receiver that looks for the signal that bounces back and based on the amount of time, it can tell you how far the sensor is from a wall. making it useful in dark applications and telling your robot to stop before it gets to an obstacle. To program it, you can once again select it to wait til the value gets greater than a certain value or less than a certain value. Finally there is the forgotten rotation sensor. Most people dont realize it is there because it is built into the motor. To program this sensor, you can choose the number of degrees or rotations to wait for the motor to turn either forwards or backwards. We have used this sensor in the circuit race challenge. In this challenge, we had to calculate the number of degrees that the motors should turn so that it would go around the track without going to the inside. Wait blocks stop waiting when a command is met. All of the above applications use wait blocks

Frequency & Amplitude

Last week, we learned about the sound sensor on the NXT and how to set thresholds and we also did an investigation about whether the NXT picks up frequency, amplitude, or both. In the first investigation, we learned that to find the threshold to use in a program, you must take the minimum sound value the sound sensor reads on the nxt, add the maximum value the sound sensor reads and divide by two. You are in essence taking the average of the two values. In the next investigation, we looked at the sensors response to frequency and its response to amplitude. Frequency is the pitch the sound is and amplitude is the volume. In the end, we found that amplitude is much more reliable in getting a reading. Also, as the amplitude increases, the value on the sound sensor increases. For frequency, the values were all over the place which was not much help in a program. In conclusion, frequency is not a good thing to measure using the NXT sound sensor.

Monday, March 16, 2009

Chapter 6: Building stragegies

The topics discussed in chapter 6 are Studless Building Techniques, maximizing Modularity, loading the structure, putting it all together: chassis modularity and load, and hybrid robots: using studless and studded lego pieces. With the new lego parts, studless bricks are now taking over studded bricks. Studless bricks are more flexible but that doesnt mean weaker. Four different beam arrangements are given. Arrangement A is the straight beam. Arrangement B is the L shaped beam. Arrancement C is the is a multiple beams hooked together in a way so there are beams facing every direction. Finally arrangement D is where there are two beams connected by a rod. Arrangement A alone isnt very useful but when hooked to something else, it can provide stability. Arrangement B is used to make a more rigid assembly. Arrangement C can connect two white beams. Arrangement D is useful to like the two beams in option A but it will not work under tension. Combining these four configurations can give you a light and sturdy robot. An important note was also given about the pegs. It says that the black and blue pegs are better to use when connecting beams because they fit tighter. The gray and tan ones are better suited for moving parts. The next section was about modularity which is where you build the robot in sections that can be removed and used for other projects and can also be removed without having to deconstruct the whole robot. Sometimes you have to give up a little modularity to get the robot more compact but the more modular the robot, the easier it will be to handle. Loading the structure was the next section. To start off, the book says to keep the wheel close to the supporting beam because it acts as a lever the further out it goes. The gears also need to be close to supporting beams to ensure that there is minimal friction in the system. If there are two gears, it is a good idea to connect the two axles with a beam. In the next section, all of these concepts are put together. It goes on to say how it is good to separate the left and right drive assemblies which provides better modularity. Also, it mentions that you should put the load of the NXT to where it shares the load equally throughout the robot. Chapter 6 has helped me finish the drag race challenge and the tractor challenge by making it easier to make modifications and increase the strength of my robot while making it lighter at the same time.

Drag Race & Tractor Pull

To finish up the unit on gears, we had two team challenges. A drag race (test of speed) and a tractor pull (test of power). The first team challenge for the gears unit was the drag race. In this challenge, we had to make the robot that would go 3 meters in the least amount of time. To design the robot for the challenge, I first went with a 1:25 gear ratio with the standard task bot but found that the robot didn't have enough power to get started. I decided to not use a gear train and stick to a 1:5 ratio which would give me quick acceleration for the very short race. I also decided to add another motor which gave more power. I geared it the same as the others to prevent any problems from unbalance of power. The program I used was a very simple one. It had a sound sensor block in the beginning and then a forward for 3 seconds block with the coast button selected. To run the race, everyone had their program start on sound so we ran all the programs and played the beginning of a metallica song. This ensured that all the robots would start at the same time. My robot ended up getting across the line the fastest but it was very very close between me and Kenny. The next day we had the tractor pull. In this challenge, we had to build a robot that would pull or push the most weight 50 cm. in under a minute. To design the robot, I needed more torque and less speed. In this challenge, I made a gear train which gave my robot a gear ratio of 25. To get more friction between the robot and the ground, I put some weight on the front and back of the robot and I added extra wheels. My program was even more simple than the drag race. I consisted of a move block with the time box set for 60 seconds. For the first trial in the tractor pull, I decided to push 2 kg. My robot did this without even the slightest hint of it putting much effort in. After this, I decided I better do some testing to find out how much my robot was capable of pushing. It was able to push 7 kg with just a little bit of trouble so I decided that was the best weight to push for my final trial. My robot did it in 45 seconds. 7 Kg was also the highest in the class. All in all, these challenges helped us apply what we have learned about gears to something practical.

Thursday, March 5, 2009

Tuesday, March 3, 2009

Chapter 2: Gears


Gears serve many purposes on a robot. they can make your robot go fast, they can make your robot have a lot of torque (power), or you can make it go somewhere in between. The terminology used is driven gear and driving gear. the driving gear is the one attached to the motor. The driven gear is gear attached to the wheel. to find the gear ratio, you must divide the number of teeth on the driven gear by the number of teeth on the driving gear. If the gear ratio is below one, the robot will go faster with less power than if it had a gear ratio of one. If the gear ratio is above one, the robot will go slower than a ratio of 1 but it will have more power. Also, if you need a lot of power or a lot of speed, you can make a geartrain which connects different gears. If a geartrian is used, it multiplies the ratio of the first gear by the ratio of the second set of gears. There are gears called bevel gears which are helpful in changing the direction of the force. This is good if you dont have room for the wheel but you do in another spot. Another topic discussed in this chapter is pulleys. Pulleys can be used to lift an object and they can work the same way as gears. You can get more power or more speed dependent on the size. This is what was discussed in Chapter 2.

Wednesday, February 25, 2009

My Block Is Your Block

For Homework I read chapter 26, my block is your block. This chapter is all about my blocks. My blocks are very useful and have the potential to save you a lot of time in programming and preventing careless errors. My blocks dont have any set action. The action or actions are set by the user. To make a my block, make a normal program in the NXT programming software. If there is a lot of parts that repeat such as a right turn, it would be adventageous to put into a my block. After making the program, select the part you want to make into a my block my holding shift and selecting all the blocks you want. Make sure they are all next to each other in the porgram. Next, while the blocks are still selected, go to edit and make a new my block. In the pop up window, you can change the name and add a description of the block. Click next when you are satisfied with this part and then choose an icon for the block. Your my block is done!!!!!! To save your my block, go to your program and double click on the my block. This will open up a new tab with the my block program in it. Click save and choose the filepath you want to save the myblock to. I used my blocks in the circuit race challenge. I found it was very useful on the right 90 degree turn because it makes sure that the program stays the same for each right turn. Also, it made my program much more manageable because instead of having 5 or 6 blocks for every turn (3 of them), you only have one block. This made it very easy to edit the distances that the robot went on the tape without worrying about accidentaly messing up a forward block. For these reasons, my blocks are very useful tools to help you achieve your programming goals.

Monday, February 23, 2009

Team Challenge: Circuit Race

Today, we did a team challenge: the Circuit Race. The name was a little misleading for this challenge. First of all, I worked solo on this challenge and the second thing was it was not really a race, it was just to see if you you could make the robot go around the square without crossing the black tape line. It was 12 and it was time for the race. I volunteered to go first. The first run, my robot jumped for some reason, something it did not do in the trial runs. This jump caused it to run over the black tape. I was given another chance to start so I re-ran the program and everything went smoothly. To design the program, I first took the measurements off the course. I found out that all the sides were not equal so it was not really a square. I set up the ratios we learned in the wheels and distance lab. I took each side, entered in the correct number of degrees and ran each side one by one until I got the correct distance. Next I had to work on the right turn. I used the measured turns lab and decided to go with the swing turn because it was easier to control. I also turned the power down so the robot would be more accurate and not jumpy. I found that using the ratio, the turn was close but not exact so I had to make some modifications. Since the right turns would always be the same, I set up a myblock that had the right turn programmed in it. This saved me a lot of time, made sure I didnt mess up the program from doing it too many times, and made my program more organized. About the design of the robot: I tried running the course with large wheels at first to go for speed but they were not stable and therefore gave me inconsistent results. I then tried the smaller flat wheels which made the robot slow but very accurate. This is what I did for success in the Circuit Race.

Sunday, February 15, 2009

Movin' and Making Turns

A lot was accomplished in the past week in robotics class. We completed two labs which is a lot especially considering it was a short week. The labs we completed were measured turns and right face. In measured turns, I learned how to get the robot to turn the number of degrees that i want it to. This is done by setting up a ratio using the circumference of the circle and the circumference of the wheel. This is useful if you want the robot to turn a specific direction and be very precise. In right face, we learned the difference between a swing turn and a point turn. In a swing turn, only one wheel spins while the other stops. In a swing turn, one wheel goes forward and the other goes backwards, resulting in a much quicker turn. For homework, I read chapter 4 of the lego programming guide. This chapter was all about the move block. The move block is a useful block that can save you a lot of time. In this block, you can control more than one motor at a time and also the power to each motor. This makes turning while moving forward much easier. This block is not so good for doing swing turns though. It is just as easy to add the two motor blocks and program them accordingly. For the next challenge, Circuit race, I hope to use my knowledge of turning and forward blocks to get my robot to complete the circuit.

Monday, February 2, 2009

“Hello World, My Name Is…”


In this lab, we are creating a traditional program called "Hello world, my name is...". This is a tradition in programming where new programmers create a program where something pops up on the screen and says Hello World, My Name is..... This is done using the display blocks on the NXT programming software. We also programmed the robot to play a sound after moving forward 2 rotations, then playing a victory song after reversing 2 rotations. At the end of the lab, I made a program where after a clap, the robot displays a sad face and plays a sad sound (this is what is shown in the picture). I also did a test with 3 different people to find out if they could guess the mood of the robot and 2 got it exactly and 1 person got it very close. Using the display block, you can put in faces, words, or pictures. This can be useful to help your robot display emotion or communicate with the outside world. In the future, i will add sounds to my robot to help me figure out what part of the program is running. Also, I will use displays to keep my robot lively and display emotions after completing or failing a task.

Wednesday, January 28, 2009

What is a Robot? What is a Program?

our homework over chinese new year was to read the first two chapters in our new Lego mindstorms NXT-G Programming guide. The main principles of the two chapters are how is a robot different from a toaster?, Why is program structure important? and what are the steps the book suggest for you to follow if you are going to write a program? A robot is different from a toaster because a robot moves and reacts on its own, something a toaster can not do. Program structure is important because if the orders for a robot are given in the wrong order or they are not detailed enough, the robot will not know what to do. Finally, the steps the book suggests we follow to write a program are
  1. write a pseudo code
  2. transfer it to the NXT-G program

Thursday, January 22, 2009

Full Speed Ahead

In the full speed ahead lab, we learned how to make our robot move forward. this was not without a few glitches along the way. we learned that we could not just put one forward motor block. that would make the robot turn in circles because only one motor was working. We then added the second motor forward block and the turn motors off after 2 rotations. this made the robot move forward but stop gradually. This is not what we wanted. We then added a stop block afterwards to make sure the robot stopped instantly. With the program writing software, i discovered that you had to place a brick right next to the other to make a block work. Also, you had to calibrate the settings to get the right motor to turn and for how long you wanted it too. We also attempted to get the NXT to connect to the computer via bluetooth but we could not figure out how to get the programs to send so we ended up using the cable and pressing the download button.

Tuesday, January 20, 2009

Chapter 1

In chapter 1, I learned that the Lego Technic bricks are very different from the original lego bricks. the new lego bricks offer the option of putting in beams, which has the potential to greatly reduce the weight and amount of peices needed to build your robot. I also learned that lego builders express the lise of Legos with 3 numbers that represent the width, length, and height. Width and length are expressed in studs (the circle looking things on top of the bricks). Another important fact about the Lego cube is that height and width are not proportional. the height is bigger by a factor of 1.2. A plate is a normal brick but with 1/3 of the height. I also learned that studs have a 5:6 ratio with the normal lego bricks. So every 6 bricks, the beam will line up with the holes. Another important note is that i finished my taskbot with minimal glitches so by tomorrow, i should have it up and running hopefully with a few programs.

Wednesday, January 14, 2009

What Defines a Robot?

A robot is a artifically created, programmed object that can take in information about the outside world, move and usually immitate human behavior. In todays lesson, I learned how to use sensors, motors, attach wheels to the motor, how to turn on the nxt, and how to run programs on the nxt. My first robot was one that changed motor speed by sound. The louder the sound, the faster the wheels moved. I look forward to seeing what else these robots can do